React-redux 이해하기
Redux란?
React 프로젝트의 규모가 커질때마다 자식으로 넘겨주어야 하는 props의 깊이도 점점 깊어진다. 따라서, 어디에서든 내가 원하는 state를 사용할 수 있는 라이브러리 Redux가 나타났다.
Redux는 React 뿐만 아니라, Angular, Vue, 바닐라 JS 등에서도 모두 사용가능하지만, 해당 글은 React만 다룬다
Redux만 사용하여 React에서 사용할 수 있지만, 더 편하게 사용하기 위해 React-Redux가 나왔다.
React-redux 알아보기
완성 화면
왼쪽의 노래 목록에서 클릭(select)한 것을 오른쪽에 띄워보는 프로젝트를 만들어보며, react-redux에 대해 알아보자. 해당 프로젝트는 Modern React with Redux (Udemy)의 내용을 토대로 만들었다.
세팅
$ create-react-app songs
$ cd songs
$ npm install redux react-redux
src안의 내용을 전부 삭제 후, 밑의 구조처럼 폴더와 파일을 생성한다.
src
├─ actions
├─ components
├─ reducers
└─ index.js
src/index.js
import React from 'react'
import ReactDOM from 'react-dom'
import App from './components/App'

ReactDOM.render(<App />, document.querySelector('#root'))
src/components/App.js
import React from 'react'

const App = () => {
  return <div>App</div>
}

export default App
그리고 스타일링에 신경쓰지 않기 위해 public/index.html에 Semantic-ui를 추가한다.
<!-- ... -->
<head>
  <link
    rel="stylesheet"
    href="https://cdnjs.cloudflare.com/ajax/libs/semantic-ui/2.4.1/semantic.min.css"
  />
</head>
<!-- ... -->
action creator, reducer 생성
본격적으로 리덕스로 상태관리를 하기 위해 먼저 action creators를 만든다.
src/actions/index.js
// action creator
export const selectSong = song => {
  // return an action
  return {
    type: 'SONG_SELECTED',
    payload: song,
  }
}
src/reducers/index.js
// 노래 목록을 알려주는 reducer
const songsReducer = () => {
  // 아무것도 바꾸지 않기 때문에 어떠한 argument도 없음
  return [
    { title: '소주 한잔', duration: '4:51' },
    { title: 'Memories', duration: '3:10' },
    { title: '널 좋아하나봐', duration: '3:44' },
    { title: '거짓말이라도 해서 널 보고싶어', duration: '3:48' },
  ]
}

// 선택된 노래를 알려주는 reducer
const selectedSongReducer = (selectedSong = null, action) => {
  // 선택된 노래의 초기값을 null로 두고, action을 가져오기 위해 인자로 받아 옴
  if (action.type === 'SONG_SELECTED') {
    return action.payload
  }
  return selectedSong
}
그 후, 만든 action creator와 reducers를 src/index.js에게 알려주어 전역에 뿌려야 한다.
그러기 위해서 우선 reducer를 하나로 묶어 준다.
src/reducers/index.js
import { combineReducers } from 'redux'

// 노래 목록을 알려주는 reducer
const songsReducer = () => {
  // 아무것도 바꾸지 않기 때문에 어떠한 argument도 없음
  return [
    { title: '소주 한잔', duration: '4:51' },
    { title: 'Memories', duration: '3:10' },
    { title: '널 좋아하나봐', duration: '3:44' },
    { title: '거짓말이라도 해서 널 보고싶어', duration: '3:48' },
  ]
}

// 선택된 노래를 알려주는 reducer
const selectedSongReducer = (selectedSong = null, action) => {
  // 에러 방지를 위해 selectedSong의 초기값을 null로,
  // action을 가져오기 위해 인자로 받아 옴
  if (action.type === 'SONG_SELECTED') {
    return action.payload
  }

  return selectedSong
}

export default combineReducers({
  songs: songsReducer,
  selectedSong: selectedSongReducer,
})
전역에서 state 가져오기
src/index.js
import React from 'react'
import ReactDOM from 'react-dom'
import { Provider } from 'react-redux'
import { createStore } from 'redux'
import App from './components/App'
import reducers from './reducers'

const store = createStore(reducers)
// 생성한 store안에 모든 전역 state를 넣어 관리

ReactDOM.render(
  <Provider store={store}>
    // 전역에서 사용가능하도록 App.js를 감싸준다
    <App />
  </Provider>,
  document.querySelector('#root')
)
노래 목록을 볼 수 있는 components를 만들고, App.js에서 불러온다.
src/components/SongList.js
import React from 'react'

const SongList = () => {
  return <div>SongList</div>
}

export default SongList
src/components/App.js
import React from 'react'
import SongList from './SongList'

const App = () => {
  return (
    <div>
      <SongList />
    </div>
  )
}

export default App
connect()() 이해하기
이제 store로 뿌려준 state가 전역에서 잘 나타나는지 확인해 보면 된다. 이때 store와 해당 state를 사용하고 싶은 컴포넌트에서 connect를 사용하여 확인할 수 있다. connect는 그 안의 return 값을 반환한다.
function connect() {
  return function() {
    return '하우디엠제이'
  }
}
만약 위와 같은 connect함수가 있을 때, 호출하면 아래와 같은 결과가 나온다.
connect() // output: f()
connect()() // output: '하우디엠제이'
위와 같은 원리로, 내가 가져오고 싶은 components에서도 아래처럼 connect로 감싸주어야 한다.
src/components/SongList.js
import React from 'react'
import { connect } from 'react-redux'

const SongList = () => {
  return <div>SongList</div>
}

const mapStateToProps = state => {
  // getState와 같은 이름으로 지어도 되지만,
  // 관행상 mapStateToProps를 사용한다
  console.log(state)
  return state
}

export default connect(mapStateToProps)(SongList)
위처럼 작성했다면, 아래와 같은 console 화면이 뜬다.
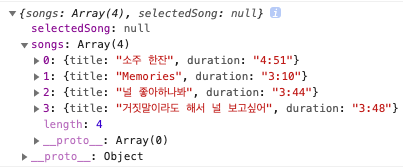
SongList - console.log(state)
정상적으로 state를 가져오는 것을 확인할 수 있다. 위의 이미지에서 확인할 수 있듯이, state가 객체에 한번 감싸져 온다. 비구조화 할당을 통해 바로 꺼낼 수 있도록 가져오자.
// src/components/SongList.js
// ...
const mapStateToProps = state => {
  console.log({ songs: state.songs })
  return { songs: state.songs }
}
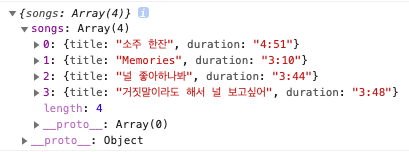
SongList - console.log({ songs: state.songs })
그리고 이제 컴포넌트 안에서도 props로 제대로 가져오고 있는지 확인해보자.
// src/components/SongList.js
// ...
const SongList = props => {
  console.log(props)
  return <div>SongList</div>
}

const mapStateToProps = state => {
  return { songs: state.songs }
}
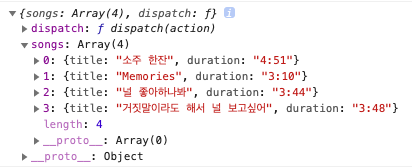
SongList - console.log(props)
보면 dispatch()도 같이 가져오는 것을 확인할 수 있다.
이제 가져온 props로 화면을 구성해보자.
src/components/SongList.js
// ...
const SongList = props => {
  const renderList = () => {
    return props.songs.map(song => {
      return (
        <div className="item" key={song.title}>
          <div className="right floated content">
            <button className="ui button primary">Select</button>
          </div>
          <div className="content">{song.title}</div>
        </div>
      )
    })
  }
  return <div className="ui divided list">{renderList()}</div>
}
src/components/App.js
// ...
const App = () => {
  return (
    <div className="ui container grid">
      <div className="ui row">
        <div className="column eight wide">
          <SongList />
        </div>
      </div>
    </div>
  )
}
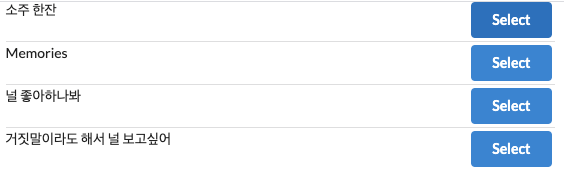
SongList 화면
action creator 동작
이제 오른쪽 Select 버튼을 눌렀을 때, 실제로 리덕스에 반영하기 위해 행동을 취해주는 action creator를 가져오자. 이때 가져온 action creator는 connect()의 두 번째 인자에 작성한다.
src/components/SongList.js
import React from 'react'
import { connect } from 'react-redux'
import { selectSong } from '../actions'

const SongList = props => {
  console.log(props) // 잘 들어왔는지 확인
  const renderList = () => {
    return props.songs.map(song => {
      return (
        <div className="item" key={song.title}>
          <div className="right floated content">
            <button className="ui button primary">Select</button>
          </div>
          <div className="content">{song.title}</div>
        </div>
      )
    })
  }
  return <div className="ui divided list">{renderList()}</div>
}

const mapStateToProps = state => {
  return { songs: state.songs }
}

export default connect(mapStateToProps, {
  selectSong, // selectSong: selectSong과 같은 것
})(SongList)
찍어본 console을 보면,
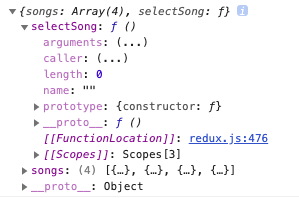
SongList - console.log(props)
아무것도 없었던 dispatch()가 selectSong()으로 바뀐 것을 확인할 수 있다. 이제 button에 onClick 함수를 추가하여 제대로 동작하는지 확인해보자.
src/components/SongList.js
// ...
const SongList = props => {
  const renderList = () => {
    return props.songs.map(song => {
      return (
        <div className="item" key={song.title}>
          <div className="right floated content">
            <button
              className="ui button primary"
              onClick={() => props.selectSong(song)}
            >
              Select
            </button>
          </div>
          <div className="content">{song.title}</div>
        </div>
      )
    })
  }
  return <div className="ui divided list">{renderList()}</div>
}

const mapStateToProps = state => {
  console.log(state) // selectSong이 잘 동작하는지 확인
  return { songs: state.songs }
}

export default connect(mapStateToProps, { selectSong })(SongList)
위의 코드 추가 후, 아무 Select 버튼을 클릭하면 선택된 것을 console 창에서 확인할 수 있다.

SongList - selectSong 동작
왜 action creator는 import하고 바로 사용하지 못할까?
분명 위에 import { selectSong } from '../actions'를 했는데도 왜 다시 export default connect(mapStateToProps, { selectSong })(SongList)에 작성해야 하는가라는 의문이 있었다.
그 이유는, 만약 위에서 import한 action creator를 해당 컴포넌트 내부에서 바로 사용하게 되면, 만든 action creator의 object가 실행될 뿐, 리액트는 이것을 dispatch로 실행해야하는지 감지하지 못한다.
// src/components/SongList.js
// 리액트가 selectedSong을 일반 함수로 착각하여
// dispatch로 실행하지 못함
const SongList = props => {
  const renderList = () => {
    return props.songs.map(song => {
      return (
        <div className="item" key={song.title}>
          <div className="right floated content">
            <button
              className="ui button primary"
              onClick={() => selectSong(song)}
            >
              Select
            </button>
          </div>
          <div className="content">{song.title}</div>
        </div>
      )
    })
  }
  return <div className="ui divided list">{renderList()}</div>
}
// ... 생략
export default connect(mapStateToProps)(SongList)
위 처럼 일반 함수로 사용한다면, 리액트는 이를 감지하지 못하여 store에도 아무런 변화가 없다.
SongDetail 구현
src/components/SongDetail.js
import React from 'react'
import { connect } from 'react-redux'

const SongDetail = ({ selectedSong }) => {
  // 비구조화 할당으로 {selectedSong}만 가져오기
  // 원래는 props로 가져온다면,
  // props.selectedSong.title, props.selectedSong.duration으로 작성
  console.log(selectedSong)
  return <div>Please select a song!</div>
}

const mapStateToProps = state => {
  // selectedSong이란 이름으로 선택된 노래 가져오기
  return { selectedSong: state.selectedSong }
}

export default connect(mapStateToProps)(SongDetail)
src/components/App.js
import React from 'react'
import SongList from './SongList'
import SongDetail from './SongDetail'

const App = () => {
  return (
    <div className="ui container grid">
      <div className="ui row">
        <div className="column eight wide">
          <SongList />
        </div>
        <div className="column eight wide">
          <SongDetail />
        </div>
      </div>
    </div>
  )
}

export default App
console을 확인해보면, 처음에는 null이었다가, select 누른 노래가 console 창에 뜨는 걸 확인할 수 있다.
이제 selectedSong이 있을 때, 화면에 나타나게 해보자.
src/components/SongDetail.js
// ...
const SongDetail = ({ selectedSong }) => {
  return (
    <>
      {!selectedSong ? (
        // 선택한 곡이 없을 때 화면
        <div>Please select a song!</div>
      ) : (
        // 선택한 곡이 있을 때 화면
        <div>
          <h3>노래 상세</h3>
          <p>제목: {selectedSong.title}</p>
          <p>시간: {selectedSong.duration}</p>
        </div>
      )}
    </>
  )
}
// ...
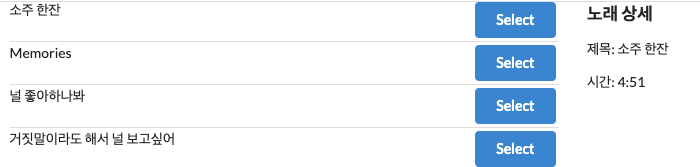
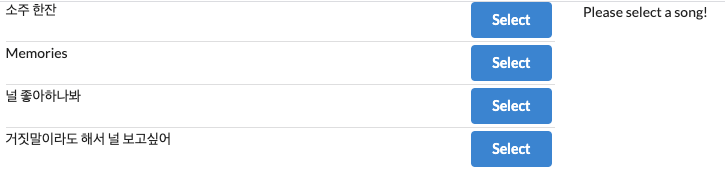
SongDetail 동작
정상적으로 화면에 구현되는 것을 확인할 수 있다.
완성 코드: songs-react-redux