Angular 파일 구조 소개
최근 Angular 대비 상대적으로 러닝커브가 낮고 사용하기 편한 React, Vue, Svelte 등이 나오면서 Angular의 사용률이 전체적으로 낮아지고 있는 추세다. (참고)
필자도 React만 사용해보다 처음으로 Angular를 사용해봤는데, 확실히 러닝커브가 높은 편이지만 그만큼 매력적인 면도 많다고 생각한다. 본 글에서는 Angular의 특징이나 원칙 등의 원론적인 내용은 제외하고 사용할 때 꼭 알아야 할 내용을 다룬다.
Angular 설치
# Angular CLI 설치
$ npm install -g @angular/cli

# Angular 프로젝트 생성
# 본 글에서는 angular routing을 설치했으며, scss를 선택했다
$ ng new <프로젝트명>
$ cd <프로젝트명>
본 글에서 @angular/core는 ~11.2.12, rxjs는 ~6.6.0, typescript는 ~4.1.5 버전을 사용했다.
# 로컬에서 실행 및 창 열기
$ ng serve --open

잘 실행되었다면, http://localhost:4200/에 위와 같은 화면이 보인다.
실행 포트를 바꾸고 싶다면,
$ ng serve --open --port 4300
위 처럼 실행하면 된다.
폴더의 기본 구조는 아래와 같으며, 본 글에서는 /src/app 폴더 안에서 필수적으로 알아야 할 것들 위주로 다룬다.

폴더 구조
Angular 구조
Angular에는 크게 Component(컴포넌트), Template(템플릿), Directive(디렉티브), Service(서비스) 그리고 Module(모듈)이 존재한다.
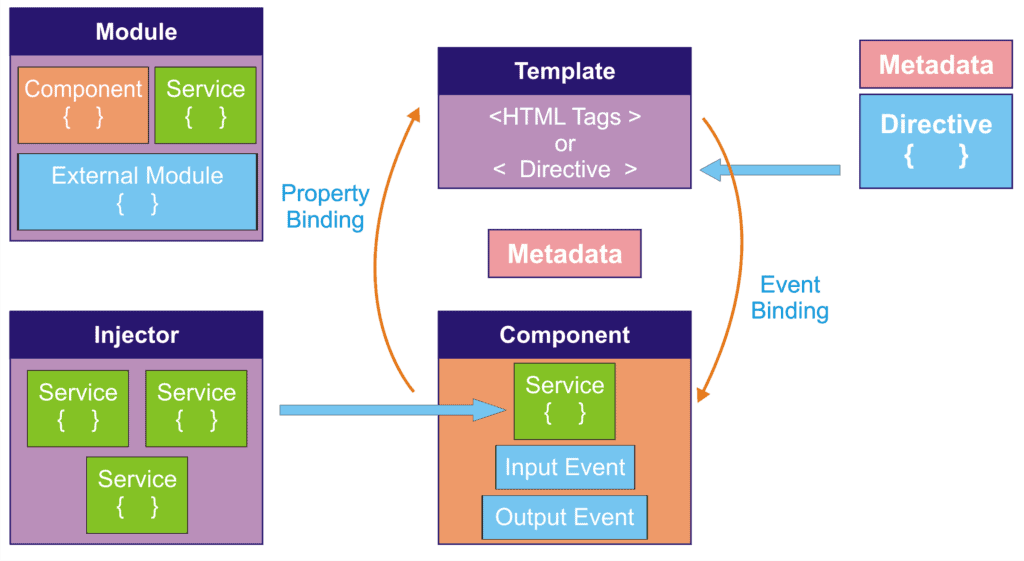
https://www.ngdevelop.tech/angular/architecture/
Angular 프로젝트를 생성하면 기본으로 만들어지는 모듈과 컴포넌트가 있다. 모듈은 app-routing.module.ts와 app.module.ts가 있으며, 컴포넌트는 app.component.html, app.component.scss, app.component.ts, app.component.spec.ts가 있다.
구성 요소 생성 방법
| 생성할 구성 요소 | 명령어 |
|---|---|
| 컴포넌트 | ng generate component <컴포넌트 이름> |
| 디렉티브 | ng generate directive <디렉티브 이름> |
| 서비스 | ng generate service <서비스 이름> |
| 모듈 | ng generate module <모듈 이름> |
혹은 Angular Schematics Extension을 설치 한 후, 폴더에서 마우스 우클릭을 해서 component, service, module 등을 만들 수 있다.

생성
NgModule(Module)
NgModule은 Angular에서 가장 중요한 구성 요소로 관련 있는 다른 요소를 묶는 역할을 한다. NgModule에는 사용할 컴포넌트나 서비스 프로바이더 등이 포함할 수 있으며, 외부로 공개(공유)할 지 아니면 다른 곳에서 해당 NgModule로 가져와 사용할 지 등을 정할 수 있다.
모든 Angular 프로젝트에는 반드시 하나 이상의 모듈이 존재하며, 그 중 보통 AppModule (app.module.ts)이 단 하나의 최상위 모듈이다. 프로젝트 규모가 작으면 AppModule 하나만 있는 경우도 있다. React의 App.js와 비슷하다.
src/app/app.module.ts
import { NgModule } from '@angular/core'
import { BrowserModule } from '@angular/platform-browser'

import { AppRoutingModule } from './app-routing.module' // routing 설치 시 생성
import { AppComponent } from './app.component'

@NgModule({
  declarations: [AppComponent],
  imports: [BrowserModule, AppRoutingModule],
  providers: [],
  bootstrap: [AppComponent],
})
export class AppModule {}
새로 생성된 컴포넌트는 하나의 NgModule에서 불러와야 사용할 수 있다.
- declarations: 해당 모듈에 포함될 구성요소(컴포넌트나 디렉티브, 파이프)의 리스트를 선언한다.
- exports: 해당 모듈의 컴포넌트나 디렉티브을 다른 모듈에서 사용하고 싶을 때 작성. AppModule(최상위 모듈)에는 존재하지 않는다.
- imports: FormsModule, AppRoutingModule 등과 같은 외부 모듈(혹은 라이브러리)을 사용하고 싶을 때 추가한다. 외부 모듈은 앵귤러 모듈일수도 있고, 사용자가 정의한 모듈일수도 있다.
- providers: 모듈 내에 생성된 서비스 프로바이더를 작성한다. injector가 여기에서 서비스의 존재를 알아 차릴 수 있다.
- bootstrap: 프로젝트의 진입점으로 최상위 컴포넌트(일반적으로 app.module.ts)에만 작성한다.
Component
AppComponent를 보면 네 개의 파일이 존재한다.
- app.component.html: HTML 템플릿 파일
- app.component.scss: SCSS 파일 (기본은 CSS 파일)
- app.component.ts: 컴포넌트 파일 (TypeScript)
- app.component.spec.ts: 테스트 파일
src/app/app.component.ts
import { Component } from '@angular/core'

@Component({
  selector: 'app-root',
  templateUrl: './app.component.html',
  styleUrls: ['./app.component.scss'],
})
export class AppComponent {
  title = 'rxjs-angular' // 처음에 설정한 프로젝트명이 title의 기본값으로 설정
  // 컴포넌트 클래스 영역
}
@Component 데코레이터에는 메타데이터 객체를 인자로 전달하며, 컴포넌트 생성에 필요한 정보를 담고 있다.
- selector: HTML 템플릿의 이름이며, 다른 템플릿에서
<app-root></app-root>으로 import 할 수 있다. - templateUrl: 해당 컴포넌트의 HTML 템플릿과 매핑한다.
- styleUrls: 해당 컴포넌트의 스타일 파일과 매핑한다.
혹은 HTML 템플릿과 CSS를 따로 파일로 만들지 않고, template, styles를 이용해 ts 파일에 바로 만들 수도 있다.
import { Component } from '@angular/core'

@Component({
  selector: 'app-root',
  template: `
    <h1>{{ title }}</h1>
  `,
  styles: [
    `
      h1 {
        color: red;
      }
    `,
  ],
})
export class AppComponent {
  title = 'Angular 구조 및 사용법' // 제목 변경
  // 컴포넌트 클래스 영역
}
컴포넌트 클래스 영역은 해당 컴포넌트 뷰를 관리하기 위한 로직을 담은 클래스를 정의한다. 여기에는 프로퍼티, 메서드 그리고 input/output 이벤트와 ngOnInit, ngOnDestroy 등과 같은 라이프싸이클 메서드를 작성할 수 있다. 라이프싸이클은 아래에서 다시 살펴보도록 하자.
Service
서비스는 주로 쿠키나 스토리지, 채널톡, 카카오톡 상담, 모달 등 어느 컴포넌트에서든 사용할 수 있는 공통 로직을 작성한다.
@Injectable()
export class ExampleService {
  // ...
}
그리고 @Injectable 데코레이터틀 작성하여 데이터 공유 클래스와 비즈니스 로직으로 동시에 사용이 가능하다.
Directive
Angular가 제공하는 디렉티브는 크게 어트리뷰트 디렉티브(Attribute Directive)와 구조 디렉티브(Structural Directive)로 나뉜다.
디렉티브는 DOM의 모든 것을 직접 관리할 수 있다. HTML 요소 또는 어트리뷰트의 형태로 사용하여 디렉티브가 사용된 요소에게 무언가를 하라는 지시(directive)를 전달한다. 디렉티브는 프로젝트 전역에서 사용할 수 있는 공통 관심사를 컴포넌트에서 분리한 것으로 구현하여 컴포넌트의 복잡도를 낮추고 가독성을 향상시킨다.
어트리뷰트 디렉티브
- NgClass: CSS 클래스 추가/제거
- NgStyle: HTML 스타일 추가/제거
- NgModel: HTML 폼 요소에 양방향 데이터 바인딩 추가
구조 디렉티브
- NgIf: 조건에 따라 DOM에 추가/제거
- NgFor: 배열 항목마다 DOM에 추가
- NgSwitch: 조건에 맞는 것을 선택해서 DOM에 추가
기본으로 내장되어 있는 것 외, 사용자가 직접 만들어 쓸 수도 있다. 글자의 색상을 파란색으로 바꾸는 디렉티브를 만들어보자.
# 명령어 실행 후, 자동으로 app.module.ts의 declarations에 추가 됨
$ ng generate directive blueText
src/app/shared/blue-text.directive.ts
import { Directive, ElementRef } from '@angular/core'

@Directive({
  selector: '[blueText]',
})
export class BlueTextDirective {
  constructor(el: ElementRef) {
    el.nativeElement.style.color = 'blue'
  }
}
<h1>{{ title }}</h1>

<div blueText>blue title: {{ title }}</div>

잘 적용되었다면 위처럼 파란색으로 바뀐 것을 알 수 있다.
Pipe
파이프(pipe)는 템플릿에서 사용되며, 화면에 표시하는 형식만 변경하고 싶을 때 사용한다.
$ ng generate component components/pipe
src/app/components/pipe/pipe.component.ts
import { Component, OnInit } from '@angular/core'

@Component({
  selector: 'app-pipe',
  templateUrl: './pipe.component.html',
  styleUrls: ['./pipe.component.scss'],
})
export class PipeComponent implements OnInit {
  now = new Date()

  constructor() {}

  ngOnInit(): void {}
}
src/app/components/pipe/pipe.component.html
<div>{{ now }}</div>
<!-- 결과: Wed May 19 2021 17:03:16 GMT+0900 (대한민국 표준시) -->

<div>{{ now | date }}</div>
<!-- 결과: May 19, 2021 -->

<div>{{ now | date: "y년 MM월 dd일" }}</div>
<!-- 결과: 2021년 05월 19일 -->
날짜 외에도, 화폐, 대소문자, 소숫점, 퍼센트, 비동기 등의 pipe가 있다.
{{ 'howdy-mj' | uppercase }}
<!-- 결과: HOWDY-MJ -->

{{ 10000 | currency }}
<!-- 결과: $10,000.00 -->
<!-- 화폐 단위는 i18n 가이드에 있는 것을 따른다. -->

{{ 1.2345 | number: "1.2-2" }}
<!-- 결과: 1.23 -->
{{ 1.2345 | number: "3.2-2" }}
<!-- 결과: 001.23 -->

{{ 0.1234 | percent }}
<!-- 결과: 12% -->
{{ 0.1234 | percent: "2.1" }}
<!-- 결과: 12.3% -->
더 자세한 건 공식문서의 Pipe API List를 참고하면 된다.
참고